My Store
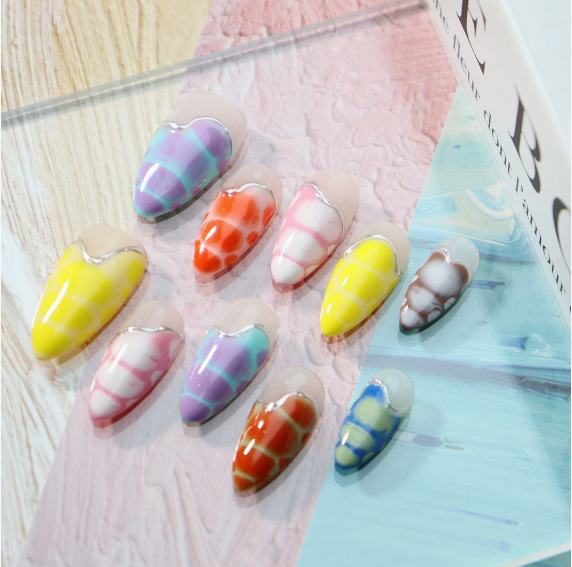
Jelly Grid
Jelly Grid


Couldn't load pickup availability
DESCRIPTION
Pallaska™ Jelly Grid is a pixelated sugar rush. Featuring a patchwork of glossy gingham-inspired blocks in bubblegum tones — from lemon yellow to icy blue — each nail is finished with a heart-shaped metallic outline that melts into a translucent nude base. It’s abstract, nostalgic, and a little chaotic (in the best way).
This set is your inner child in nail form — think candy wrappers, sticker sheets, and 90s plastic charm rings.
Our press-on nails are handcrafted with salon-grade gel and are reusable for multiple wears. We recommend using jelly adhesive tabs to extend the life of the nails, as glue may cause damage to both your natural nails and the press-ons, making them unsuitable for reuse.
Material: Synthetic Resin (PMMA / ABS)
Complimentary nail application tool kit includes:
- 1 sheet of jelly adhesive tabs
- 1 nail file
- 1 alcohol pad
- 1 cuticle stick
- 1 instruction card
How to apply?
How to apply?
Preparation Steps (Before Application)
1. Soak hands in warm water to soften cuticles.
2. Gently push back cuticles with a cuticle stick.
3. Trim and shape your natural nails.
4. Lightly buff the nail surface, especially around the edges.
5. Clean the nail surface thoroughly to remove oils and dust (to ensure a smooth, secure application).
Using Jelly Adhesive Tabs
1. Choose a jelly tab that fits your nail size. Leave a 1–3mm gap from the cuticle.
2. Press the jelly tab firmly from the center outward to flatten and smooth it.
3. Align the press-on nail at a 45° angle from the cuticle and press onto the tab.
4. Hold firmly for 5 seconds. Avoid water contact for the next 3 hours.
5. You're done!
Using Nail Glue
1. Apply glue to the back of the press-on nail (about 1/3 of the area).
2. Align and press the nail firmly onto your natural nail.
3. Hold for 5 seconds. Avoid water contact for 3 hours.
4. All done!
Note: To protect your natural nails, let them rest for 1–2 days after a week of wear.
How to remove?
How to remove?
Using Jelly Adhesive Tabs
1. Soak your hands in warm water with soap and oil to soften the jelly tabs.
2. Gently insert a cuticle stick at an angle from the edge of the nail and slowly lift.
3. Remove any remaining adhesive.
4. Apply cuticle oil to restore moisture and protect the nail bed.
Using Nail Glue
1. Apply glue remover or acetone around the edges of the press-on nail.
2. Gently insert a cuticle stick at an angle and slowly wiggle to loosen the nail.
3. Remove any remaining glue.
4. Apply cuticle oil to restore moisture and protect the nail bed.
Can I reuse them?
Can I reuse them?
Yes, you can reuse our press-on nails — especially if you apply them using jelly adhesive tabs instead of glue.
Reuse Tips:
Use sticky tabs for gentle, non-damaging wear and easy removal.
Avoid glue if you plan to reuse — glue can leave residue and may damage the nails during removal.
After removing, clean off any leftover adhesive and store the nails in the original box for next use.
Keep nails dry and clean while wearing to preserve their shape and finish.
Shipping & Returns
Shipping & Returns
UK shipping
Orders are processed within 1–2 business days. (Please note: Artist Collection require 7–12 business days.)
Standard £2.99: 2-4 business days
(FREE Shipping Orders £30+)
Express £4.99: 1–2 business days
Returns - We accept returns up to 14 days after receiving nails. All we ask is nails are unworn. (Please note: Items from the Artist Collection and final sale are not eligible for return or refund.)
Please see Shipping & Returns page for full details.